Nginx常见配置
性能
配置头
# default: 1; worker的数量
worker_proceses auto;
# Changes the limit on the maximum number of open files (RLIMIT_NOFILE) for worker processes
worker_rlimit_nofile 30000;
连接数
The worker_connections command tells our worker processes how many people can simultaneously be served by Nginx. The default value is 768;
可以通过查看 ulimit -n 决定
events {
  worker_connections  20000;
}
tcp设置
server {
  # default: off; sendfile 配置可以提高 Nginx 静态资源托管效率。sendfile 是一个系统调用,直接在内核空间完成文件发送,不需要先 read 再 write,没有上下文切换开销。参考1
  sendfile on;
  # default: off; TCP_NOPUSH 是 FreeBSD 的一个 socket 选项,对应 Linux 的 TCP_CORK,Nginx 里统一用 tcp_nopush 来控制它,并且只有在启用了 sendfile 之后才生效。启用它之后,数据包会累计到一定大小之后才会发送,减小了额外开销,提高网络效率。参考1
  tcp_nopush on;
  # default: off; TCP_NODELAY 也是一个 socket 选项,启用后会禁用 Nagle 算法,尽快发送数据,某些情况下可以节约 200ms(Nagle 算法原理是:在发出去的数据还未被确认之前,新生成的小数据先存起来,凑满一个 MSS 或者等到收到确认后再发送)。Nginx 只会针对处于 keep-alive 状态的 TCP 连接才会启用 tcp_nodelay。参考1
  # https://www.zhihu.com/question/42308970
  # https://en.wikipedia.org/wiki/Nagle%27s_algorithm
  tcp_nodelay on;
  # 可以看到 TCP_NOPUSH 是要等数据包累积到一定大小才发送,TCP_NODELAY 是要尽快发送,二者相互矛盾。实际上,它们确实可以一起用,最终的效果是先填满包,再尽快发送。
}
buffer
server {
  # This handles the client buffer size, meaning any POST actions sent to Nginx
  client_body_buffer_size 10K;
  # Similar to the previous directive, only instead it handles the client header size. For all intents and purposes, 1K is usually a decent size for this directive.
  client_header_buffer_size 1k;
  # The maximum allowed size for a client request. If the maximum size is exceeded, then Nginx will spit out a 413 error or Request Entity Too Large.
  client_max_body_size 8m;
  # The maximum number and size of buffers for large client headers.
  large_client_header_buffers 2 1k;
}
timeout
server {
  # the time a server will wait for a client body or client header to be sent after request. If neither a body or header is sent, the server will issue a 408 error or Request time out.
  client_body_timeout 12;
  client_header_timeout 12;
  # the timeout for keep-alive connections with the client. Simply put, Nginx will close connections with the client after this period of time. Nginx 的默认值是 75 秒,有些浏览器最多只保持 60 秒
  keepalive_timeout 60;
  # Is established not on the entire transfer of answer, but only between two operations of reading; if after this time client will take nothing, then Nginx is shutting down the connection.
  send_timeout 10;
  # default off; 连接超时后将通过向客户端发送RST包来直接重置连接。不使用4次挥手。可能会出现问题
  # 可能出现RST的情况:https://blog.csdn.net/hzw05103020/article/details/50806759
  # RST攻击:https://russelltao.iteye.com/blog/1405349
  reset_timeout_connection on;
}
MIME types
server {
  # 定义文件扩展名到MIME type的映射,多个扩展名可以对应一个MIME type
  include /etc/nginx/mime.types;
  # 默认MIME type
	default_type text/plain;
  # 为了快速寻找到相应MIME type,Nginx使用散列表来存储MIME type与文件扩展名。types_hash_bucket_size 设置了每个散列桶占用的内存大小。
  types_hash_bucket_size 128;
  # types_hash_max_size影响散列表的冲突率。types_hash_max_size越大,就会消耗更多的内存,但散列key的冲突率会降低,检索速度就更快。types_hash_max_size越小,消耗的内存就越小,但散列key的冲突率可能上升。
  types_hash_max_size 2048;
}
gzip
server {
  gzip             on;
  gzip_vary        on; # https://imququ.com/post/vary-header-in-http.html
  gzip_comp_level  2;
  gzip_min_length  1000;
  gzip_proxied     any;
  gzip_types       text/plain application/javascript text/xml text/css application/xml;
  gzip_disabled    "msie6";
}
引入其它文件
# /etc/nginx/nginx.conf
server {
  include /etc/nginx/sites-enabled/*;
}
cache
server {
  location ~* .(jpg|jpeg|png|gif|ico|css|js)$ {
    expires 365d;
    expires max;
    etag on;
  }
}
proxy_cache
摘自参考1.
首先,在配置最外层定义一个缓存目录,并指定名称(keys_zone)和其他属性,这样在配置 proxy_pass 时,就可以使用这个缓存了。这里我对状态值等于 200 和 304 的响应缓存了 2 小时。
默认情况下,如果响应头里有 Set-Cookie 字段,Nginx 并不会缓存这次响应,因为它认为这次响应的内容是因人而异的。我的博客中,这个 Set-Cookie 对于用户来说没有用,也不会影响输出内容,所以我通过配置 proxy_ignore_header 移除了它。
proxy_cache_path  /home/site/cache/nginx/proxy_cache_path levels=1:2 keys_zone=pnc:300m inactive=7d max_size=10g;
proxy_temp_path   /home/site/cache/nginx/proxy_temp_path;
proxy_cache_key   $host$uri$is_args$args;

server {
    location / {
        resolver                  127.0.0.1;
        proxy_cache               pnc;
        proxy_cache_valid         200 304 2h;
        proxy_cache_lock          on;
        proxy_cache_lock_timeout  5s;
        proxy_cache_use_stale     updating error timeout invalid_header http_500 http_502;
        proxy_http_version        1.1;
        proxy_ignore_headers      Set-Cookie;
    }
}
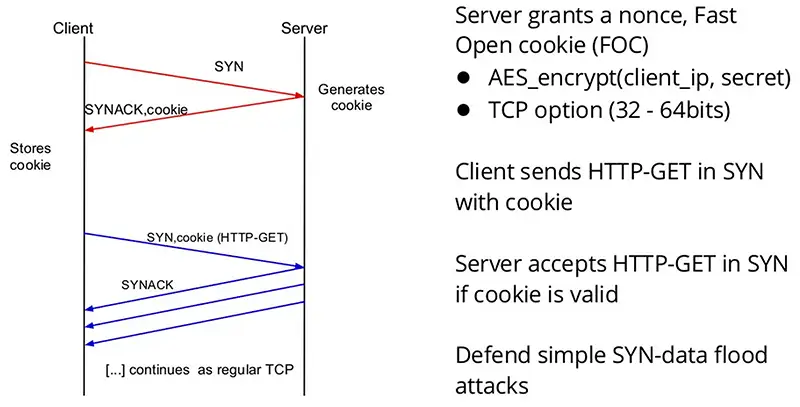
TCP Fast Open
server {
  listen 443 ssl http2 fastopen=3;
  # 3 代表最多只能有 3 个未经三次握手的 TCP 链接在排队。超过这个限制,服务端会退化到采用普通的 TCP 握手流程
  # 这是为了减少资源耗尽攻击:TFO 可以在第一次 SYN 的时候发送 HTTP 请求,而服务端会校验 Fast Open Cookie(FOC),如果通过就开始处理请求。如果不加限制,恶意客户端可以利用合法的 FOC 发送大量请求耗光服务端资源
}
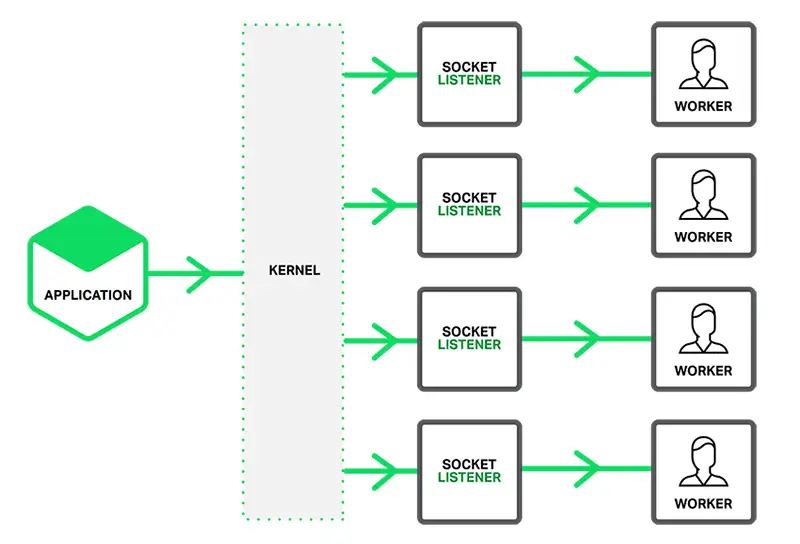
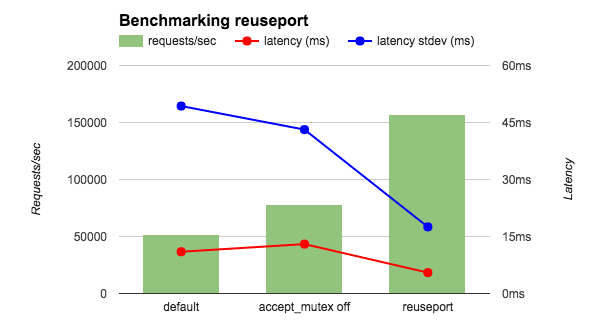
reuseport
Socket Sharding in NGINX Release 1.9.1


server {
  listen 443 ssl http2 fastopen=3 reuseport;
}
HTTPS
Let's Encrypted
- install
wget https://dl.eff.org/certbot-auto
sudo mv certbot-auto /usr/local/bin/certbot-auto
sudo chown root /usr/local/bin/certbot-auto
sudo chmod 0755 /usr/local/bin/certbot-auto
- 配置nginx
sudo /usr/local/bin/certbot-auto --nginx
- 自动更新证书
echo "0 0,12 * * * root python -c 'import random; import time; time.sleep(random.random() * 3600)' && /usr/local/bin/certbot-auto renew" | sudo tee -a /etc/crontab > /dev/null
- 在SSL Lab测试
https://www.ssllabs.com/ssltest/index.html
优化
server {
  # default none;
  # builtin 是使用OpenSSL内置的cache,只适用于一个worker process, 可能会导致内存碎片
  # shared 可以用于多个worker processes
  ssl_session_cache shared:le_nginx_SSL:1m;
  # default 5m;
  ssl_session_timeout 1440m;
  # default: ssl_protocols TLSv1 TLSv1.1 TLSv1.2;
  ssl_protocols TLSv1 TLSv1.1 TLSv1.2 TLSv1.3;
  # default: off; 倾向于使用服务端密钥
  ssl_prefer_server_ciphers on;
}
OCSP Stapling
从无法开启 OCSP Stapling 说起 ocsp stapling in firefox
server {
  resolver 8.8.8.8 8.8.4.4;
  ssl_stapling on;
  ssl_stapling_verify on;
  ssl_trusted_certificate /etc/nginx/ssl/star_forgott_com.crt;
}
- 中间证书下载工具
- 网站证书命名为site.pem, 中间证书为intermediate.pem, 根证书root.pem
- 验证
$ openssl x509 -in site.pem -noout -subject
$ openssl x509 -in intermediate.pem -noout -subject
$ openssl x509 -in root.pem -noout -subject
# 获取OCSP地址
$ openssl x509 -in site.pem -noout -ocsp_uri
http://ocsp.digicert-cn.com
$ openssl ocsp -issuer intermediate.pem -cert site.pem -no_nonce -text -url http://ocsp.digicert-cn.com
# 把
$ openssl ocsp -CAfile chained.pem -issuer intermediate.pem -cert site.pem -no_nonce -text -url http://ocsp.digicert-cn.com -header "HOST" "ocsp.digicert-cn.com"
- 验证证书有效
$ openssl s_client -connect campus.game.163.com:443 -status -tlsextdebug < /dev/null 2>&1
http2
- 添加http2
server{
  listen [::]:443 ssl http2 ipv6only=on; # for ipv6
  listen 443 ssl http2;
}
- 删除不安全的加密方式
server {
  # include /etc/letsencrypt/options-ssl-nginx.conf; # managed by Certbot<^> # 注释掉这行
  # 添加下面这行
  ssl_ciphers EECDH+CHACHA20:EECDH+AES128:RSA+AES128:EECDH+AES256:RSA+AES256:EECDH+3DES:RSA+3DES:!MD5;
}
- 添加HTTP Strict Transport Security(HSTS)
server{
  add_header Strict-Transport-Security "max-age=15768000" always;
  add_header Strict-Transport-Security "max-age=15768000; includeSubDomains" always; # 包括自域名
}
- redirect http
server {
  listen 80;
  return 301 https://$host$request_uri;
}
安全
隐藏不必要信息
server{
  server_token: off;
  proxy_hide_header: X-Powered-By;
}
禁用非必要的方法
444 是 Nginx 定义的响应状态码,会立即断开连接,没有响应正文
server {
  if($request_method !~ ^(GET|HEAD|POST)){
    return 444;
  }
}
合理配置响应头
add_header  Strict-Transport-Security  "max-age=31536000";
add_header  X-Frame-Options  deny; # 用来指定此网页是否允许被 iframe 嵌套,deny 就是不允许任何嵌套发生
add_header  X-Content-Type-Options  nosniff; # 用来指定浏览器对未指定或错误指定 Content-Type 资源真正类型的猜测行为,nosniff 表示不允许任何猜测
add_header  Content-Security-Policy  "default-src 'self'; script-src 'self' 'unsafe-inline' 'unsafe-eval' https://a.disquscdn.com; img-src 'self' data: https://www.google-analytics.com; style-src 'self' 'unsafe-inline'; frame-src https://disqus.com"; # (简称为 CSP)用来指定页面可以加载哪些资源,主要目的是减少 XSS 的发生
